Wednesday, May 23, 2012

La Madeleine's Tomato Basil Soup


I can't believe I have never posted this recipe. It is one of my favorite soups. I've served it several times and it rivals La Madeleine's version with more work but less expense. Serve it with fresh bread, cheese and wine and you will be dining in fine French style. 
Ingredients:
Servings: 8

  • 4 cups fresh tomatoes, cored, peeled, and chopped (8-10) or 4 cups canned whole tomatoes, crushed
  • 4 cups tomato juice (or part vegetable or part chicken stock)
  • 12 -14 basil leaves, washed fresh
  • 1 cup heavy cream
  • 1/4 lb sweet unsalted butter
  • salt
  • 1/4 teaspoon cracked black pepper
  • lemon juice (optional) 
  • few drops of red food color

    Directions:
    Prep Time: 15 mins
    Total Time: 1 hr
    1. Combine tomatoes, juice/and or stock in saucepan.
    2. Simmer 30 minutes.
    3. Puree, along with the basil leaves, in small batches, in blender, food processor (or better yet, one of those handy hand-held food blenders, right in the cooking pan). Return to saucepan and add cream and butter, while stirring, over low heat. Garnish with basil leaves, and add a few drops of red food color to enhance appearance.

    Kids and Politics

    This current political season offers a great opportunity for you to engage your children in the political process. Voter turnout and grassroots participation in politics has been waning for decades. Parents need to explain the political process to kids if we have any hopes of maintaining our democratic way of life.

    Seven Suggestions for Developing Future Voters

    1. Set a good example. If your children see you voting, they'll be more likely to follow your lead when they are older. Take them to the polls with you (if they are old enough), so they can see you vote and see how the process works.

    2. Talk about news stories. Use dinner time to engage in a little old-fashioned political debate.

    3. Ask your kids who they would vote for and why? You might get some interesting answers.

    4. Mention the political ads and signs when you're driving in the car. Discuss how the signs got there (volunteerism) and why do people display their support in this way.

    5. Volunteer yourself to help with campaign efforts. If the task is simple, let you kids help out.

    6. Talk to your children about why voting is an important responsibility in our country.

    7. When discussion get heated either in your own home or in the media, talk to your children about civility and respecting other people's positions--even when they are different from your own. Civil discussion is lacking in modern society, so teaching children that the discussion are great, but that they need to be done with respect will help the democratic process for years to come.

    Chicken Velvet Soup

    We have a local restaurant, La Fiesta Patio Cafe, that serves amazing soups. One of my favorites is their Chicken Velvet Soup. One of my friends tried the recipe I found which was a close approximation, but still not quite as good. Here is the recipe she used:

    Chicken Velvet Soup
    6 T. Butter
    1/3 c. flour
    1/2 c. milk
    1/2 c. light cream
    3. c. chicken broth
    1-1/2 c. finely chopped, cooked chicken

    Melt butter in saucepan. Blend in flour; add milk, cream and broth. Cook and stir until mixture thickens and comes to a boil. Reduce heat. Stir in chicken and a dash of pepper. Heat again to just boiling. Serve immediately. Serves 4.

    I added a dash of Melting Pot's Garlic and Wine seasoning to it, which was not like the original, but very flavorful. If anyone has a better or different Chicken Velvet Soup that may be closer to Patio Cafe's soup, please feel free to post your recipe. Enjoy!

    Saturday, April 28, 2012

    Stained Glass Mosaic Stepping Stone

    I took a class on how to make a stained glass mosaic stepping stone at our local stained glass store, Anything Goes With Glass. I had a Groupon so that I could afford the class. I took the class with a friend's daughter who is an amazing artist (no pressure for me!)

    They provided a pre-cut stained glass focal for us. I chose a flower and they also provided a center glass stone for the project. This is how they get rid of their glass scrap pieces. They had all sorts of types of glass. I decided on an abstract pattern (the only one in the class who did this - I just didn't want to be compared to the artist next to me.) We selected glass and glued our pieces onto a concrete stepping stone. You have to be careful that none of the glass extends beyond the edges, otherwise when someone steps on it, it can crack and break off.

    We went to lunch while the glue dried. When we returned it was time to grout. We were given black grout for the project. I was glad I chose primarily light-colored glass because it really pops with the dark grout. We were shown how to mix the grout to the consistency of thick frosting. We applied it to the glass with a grout float and spread it evenly across the glass. We then wiped the excess off with a damp rag. We got the final haze off the glass with an eraser (which works really great to shine up the glass).

    I used grout sealer when I got home so that the stepping stone would be weatherproof. I was pleased with the final product. If you haven't tried mosaic, it is really fun and rewarding.

    Tuesday, June 07, 2011

    Fishy Stuff

    My family is not particularly fond of fish. OK, they really do not like fish at all. As a result, we rarely have it for dinner. That is until I discovered steelhead trout. This fish, related to salmon and freshwater trout, has an exceptionally light, non-fishy flavor. It filets cleanly, so there are very few/no bones.

    I sampled this fish at a local market demo and discovered a great, easy way to prepare it. The secret is Colorado Spice Sweet Salmon Herb Rub. Rinse the chicken and generously rub the Herb Rub on the filets. Heat butter and garlic in a saucepan and add filets. Cook 5-7 minutes per side until golden brown.

    Wednesday, March 16, 2011

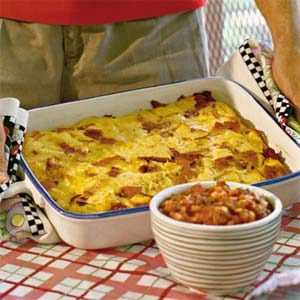
    Breakfast Casserole

    This is a great casserole to make overnight and have ready for guests in the morning. It is easy to make for a large group. Our church served this for Easter Sunrise Services, which is how I got the recipe.

    The homeless ministry where I have volunteered makes this casserole by using any available buns or bread broken up to cover the bottom of the pan, instead of bread slices. This seems to work just as well and is a good way to get rid of extra or dry bread.

    Here is the recipe:


    Cheese and Bacon Breakfast Casserole
    Ingredients:
    8 slices of bread (opt. remove crusts)
    2 c. shredded mozzarella cheese
    2 c. cheddar cheese (sharp give more flavor)
    10 slices of bacon cooked and crumbled (sausage may be substituted)
    6 eggs
     3 c. milk
    ½ tsp. sale
    Dash of pepper
    Soft Margarine

    Directions:
    Butter bread and arrange it in the bottom of a 9x13 pan. Top with cheese and bacon. Mix the rest of the ingredients and pour over bread, cheese and bacon. Set in refrigerator overnight. Bake at 350 degrees for 45-50 min. Serves 12.

    Saturday, March 12, 2011

    Sour Cream Coffee Cake

    This is a very moist coffee cake, and one our family has enjoyed for years. It also freezes well.

    2 sticks of margarine
    1/4 tsp. salt
    1 tsp. butter flavoring
    2. c. flour
    12 oz. sour cream
    2 c. sugar
    1 tsp. vanilla
    2 eggs
    1 tsp. baking powder

    Topping:
    6 Tbs. sugar
    1/2 tsp. cinnamon
    1 c. chopped pecan
    Mix together thoroughly.

    Cream  together margarine, sugar, salt and vanilla. Add eggs, one at a time, beating thoroughly after each addition. Sift flour and baking powder together and add to margarine mixture. Add butter flavoring and fold in sour cream. In greased bundt pan or 9x13 or 10x10 pan, pour 1/2 of the coffee cake mixture. Sprinkle 1/2 of the topping over cake mixture. Spread the remainder of the cake mixture into the pan and top with remaining topping. Bake at 350 degrees for 50-60 min. Frost, if desired with white icing.

    Monday, March 07, 2011

    Ziploc Ice Cream


    One of my students gave a speech on this in class. We tried it at home, and it works! This would be a great project for a Sunday School class or on a camping trip (I understand this is a favorite of Scouts).


    Ingredients:
    1 Tbsp. sugar (to taste)
    1/2 of milk or half and half
    1/4 tsp. vanilla extract
    6 Tbsp rock salt (sea salt will also work)
    1 quart size and 1 gallon size Ziploc bag
    Ice

    Directions:
    Fill the gallon size bag up halfway with ice. Add the rock salt to the ice and seal the gallon-sized bag.
    Combine the milk, sugar and vanilla in to the quart-sized bag and seal it.
    Place the quart-sized bag into the gallon-sized bag and reseal.
    Shake mixture until it becomes ice cream. It generally takes about 5 minutes.
    Open carefully and enjoy.

    You can also add other ingredients once the ice cream is finished, such as chocolate chips, cookies (I hear Girl Scout Thin Mint cookies are good in it), sprinkles, etc.

    It looks to me like you could double the recipe and it would still work. If you try it doubled, let us know how it turns out!

    Friday, December 17, 2010

    Oyster Cracker Snack Mix

    This is a holiday treat that has become a year-round one as we just can't wait until Christmas to enjoy it. Everyone always wants the recipe. It is a little different from others you may find online. The ingredient that gives it a distinctive flavor is the Tony Cachera's Creole Mix. It has a little kick to it that enhances the flavor.


    Oyster Cracker Snack


    Ingredients:
    1 c. vegetable oil
    1 pkg. Original Hidden Valley Dressing Mix
    ½ tsp. lemon pepper
    ¼ tsp. garlic salt
    ¼ tsp. garlic powder
    ½ tsp. dill weed
    ¼ tsp. Tony Cachera’s Creole Seasoning
    2 pkgs. oyster crackers (Use the standard ones, not the Premium Brand)

    Directions:
    Mix above ingredients and pour over 2 packages of oyster crackers. Let stand. Bake at 350 degrees for 15-20 min. Stir once during baking. Allow to cool. Store in an airtight container.

    Thursday, August 19, 2010

    Off to College


    Today I sent my first child off to college. It was far less traumatic than I had envisioned. Probably the fact that she is within 20 minutes of our house has something to do with lessening my trepidation. I have learned a few things from the experience.

    1. Do the orientations and tours together. It really helps both of you to be better prepared for what's ahead. I really didn't want to attend, since as a college professor I felt I knew the ropes already. I'm glad I went with her. It let me see the campus through her eyes and also showed that I was still there for her.

    2. Shop early. I bought my daughter's dorm bedding and supplies a year in advance. I found the set she liked for 70 percent off in October last year. It took a lot of the pressure off knowing that she had everything she needed. Yes, I had to store the stuff, but it saved us a lot of money and last-minute stress. I also had purchased some basic school supplies. When she had a last minute panic over needing some notebooks, pens and paper, I was able to pull them out. Yet another stress averted.

    3.  Let go of the apron strings. When I was at orientation, I overheard parents voicing concerns about curfews, student supervision, etc. It made me realize that parents often do not realize they have to let go of their kids. They are young adults. They get to decide when they go to bed, when they study, when they party, and a myriad of other choices. If you haven't prepared them in 18 years, they are not going to be prepared with more "smothering." These young adults will make both good and bad choices just like their parents. That's how we learn--trial and error.

    4. Take care of finances early. Case in point for learning by trial and error. I did not do this one, which has made making the first payments on this endeavor a bit of a concern. Take care of this in the spring so it is all ready to go in the fall.

    5. Make the student responsible. There is a huge temptation to do everything for your student, but that really doesn't help them. Let them fill out their own forms, handle registration, figure out textbook purchasing or rentals. They will have to do these things throughout their college careers, so it is best to learn how to do it right away. Sure you can give advice or information, but let/make them handle their college experience.

    I'm sure I will learn more lessons as we go through this experience. For both my daughter and I, we will likely learn all of this through trial and error.

    Tuesday, August 17, 2010

    Recipe Requests - Killer Beef Brisket

    I've had friends requesting "my" recipes. One of the most requested is the recipe for Killer Beef Brisket. This recipe I originally found in the "Stir Ups" cookbook produced by the Enid, OK Junior Welfare League with a few alterations from my kitchen. I've added the link for their cookbook if you would like your own copy. There are a lot of great recipes in the book.

    Killer Beef Brisket

    3-5 lbs. beef brisket (use double recipe for a whole brisket)
    1/3 c. Real Lemon juice
    1 c. beef broth or bouillon (I prefer Better than Beef Bouillon)
    1/2 c. red wine (optional)

    1/4 c. bottled liquid smoke
    1 small bottle of soy sauce
    1/4 tsp. garlic powder
    1/4 tsp black pepper
    1 Tbs. flour

    Use a large or turkey size plastic cooking bag (depending on if you are cooking a whole or half brisket). Add flour and shake. Combine all ingredients. Place brisket in bag and pour mixture over meat in bag. Marinate overnight or up to 24 hours in refrigerator, turning occasionally to cover all sides of meat. Leave in bag. Make 5-6 slits in top of bag and cook 5-6 hours at 275 degrees. The marinade can be thickened after removing the cooked meat with 2 Tbs. of cornstarch and used as an au jus.

    We prefer to serve it with rice and green beans.

    Saturday, April 17, 2010

    Back to Blogging - 10 Things to Know About A Ph.D.

    I haven't blogged in two years. I've been finishing my dissertation in communication, and am now officially Dr. Wollslager. So what are the top ten things I've learned in the process of becoming a Ph.D.?

    1. It is really hard to get a Ph.D. Anyone who tells you otherwise is either a complete genius or a liar.

    2. You cannot complete a doctorate without lots of help and support. If my family, friends and colleagues had not stood by me the entire way, I would have given up long ago.

    3. Ph.D.'s are not that much smarter than anyone else; they are just the ones who were persistent.

    4. You are never too old to go back to school.

    5. They make the application process complicated to weed out those people who aren't serious, and about 50 percent who start a doctorate never finish it.

    6. Get a buddy or two to help you study. Dividing readings, preparing for qualifying exams and doing research are all collegial activities. Working with others really makes the journey easier. Too often the Ph.D. process is competitive, but it really works better if you put competition aside and cooperate.

    7. The coursework is 10 times harder than it was for your master's degree. Learn how to speed read before you start.

    8. Don't be afraid to ask for help. We all think we should be smart enough to figure it all out on our own. I struggled needlessly because I was too prideful to ask for assistance.

    9. It is easier to go straight through and get your Ph.D. right after your master's. Being a non-traditional student makes the experience richer, but it takes a toll on your family life. (This is not a contradiction to #4, it is just a reality.)

    10. The best dissertation is a done dissertation. It will never be perfect. You will never have every source. You could have always done something better or different. You just have to finish it. I had to lock myself up in a friend's RV for about 5 days to get over my inertia and get the thing completed. You just have to do whatever it takes for your work style to get it finished.

    Oh... and did I mention, getting a doctorate is really hard?

    Sunday, November 16, 2008

    Monkey Bread


    I had a request for a good monkey bread recipe. This is the one that I like the best. It is easy to make and has a great taste (not low calorie, however!)


    Monkey Bread


    Ingredients:3 packages refrigerated buttermilk biscuits

    1/4 cup sugar

    1 teaspoon cinnamon

    1/2 cup butter

    1/2 cup firmly packed brown sugar

    1/4 cup sugar

    1/2 cup half & half or whipping


    Directions:Cut each biscuit in four pieces. Mix 1/4 cup sugar and cinnamon together. Dip each piece in sugar-cinnamon mixture and arrange in bundt pan.Combine butter, brown sugar, 1/4 cup sugar and half & half or whipping cream. Bring to boil and pour over biscuits while mixture is hot.


    Bake at 325° for 30 to 35 minutes.


    Serves/Makes: 16

    Friday, July 18, 2008

    Floral Arranging Yankee Candle Style


    I got this idea from a floral shop in Lawrence, KS. I decided to give it a try and you can see the results. This makes a great, economical gift that doesn't take long to make.

    Supplies:

    Yankee Candle (or similar brand) jar candle with lid
    Clear Packaging Tape
    Flower Foam (Oasis)
    Flowers (I get these from Sam's Club)
    Wire Ribbon

    Directions:

    Using the lid as a pattern cut a piece of flower foam to fit the inside of the lid. Place the foam in the lid and soak with water.

    Dry the lid completely and tape it upside down, with the foam facing up, to the top of the jar with the packaging tape. This can be a little tricky to get the lid on straight, a second set of hands is helpful.

    Arrange flowers in foam. I get my flowers in bulk from Sam's Club. A package each of carnations, alstroemeria, baby's breath or German statice, and leather leaf fern will make 3 arrangements.

    Start with one carnation in the center and two on each side. Add two more to make a cross. The center carnation should be slightly taller than the other carnations. Add alstroemeria to fill in between the carnations. Add a second row of small carnations around the bottom and fill in with alstroemeria as needed. Use the baby's breath to fill in any gaps in the arrangement. Place the leather leaf fern leaves around the base of the arrangement to hide the foam and the top of the jar. You will need to pluck off small pieces of the fern as the entire leaf is too big.

    Once you're satisfied with your arrangement, cut a piece of wired ribbon about 18 inches and tie a bow to finish it off.

    The flowers from Sam's Club (at least from my club) are very fresh and I've had friends say the arrangement lasted 3 weeks! Buying them in bulk saves cost. Also, if you can hit a Yankee Candle sale or use an off brand (be sure the lid will work) you can make this gift for about $15.

    Happy Arranging!

    Thursday, February 28, 2008

    Online Services Worth Checking


    It's a great big Web, so you may have missed some of these sites that I've found useful. Since I spend way to much time on the computer, I might as well admit it and post some of my favs. I am not receiving any endorsement money for these , so they are true third party recommendations.

    Grocery Game

    This Website maximizes your coupon savings and tells you when to stock up on certain items. For example, let's say a grocer is offering a BOGO (Buy One Get One free). You're already saving half price, then you tack on a coupon and now you having savings of 60-70%.

    Each week you print out a list of what you plan to buy from the site. It tells you what coupon insert to use from the Sunday paper (you do need to get a weekly paper and save the coupons) and when they were published. It tells you how many to stock up on. It also lets you know about unadvertised savings (for example Walgreen's doesn't always advertise their Register Rewards).

    You pay a subscription fee of $10 a month for the first store and $5 for each subsequent store. It is easy to make this back on your first shopping trip.


    Shipping Made Easy


    I ship a lot of packages from my eBay business. My favorite shipper is the good old U.S. Postal service. If you haven't discovered the Postal Service's Website, you need to visit it. From it you can do almost everything you can do in the Post Office. Plus they will give you free boxes and labels to help you mail your packages.

    Printing your labels online is a huge time saver. While the rest of you were waiting in long Post Office lines, I had the carrier pick up my packages that were already pre-posted from my house. When I did have to drop off a package at the Post Office, I just put it on the counter -- no waiting in line. You get evil stares from those in line, but who cares you're out the door in just a few seconds.!

    Another mailing service that I use is Stamps.com. For $16 a month I can buy any postage that I want and print it on my home computer. You have to buy their labels, but it works very well and you can mail postal rates not available on USPS.com. For example, you can't send media mail from the USPS site, but you can at Stamps.com. Both provide excellent service. I rarely go to the Post Office, which as far as I'm concerned is a blessing!

    My Simon Shopping Bot

    If you've never used a shopping bot, they can be very handy. I use My Simon, but there are others. What a shopping bot does is it crawls the Web and finds the cheapest price for you. When I'm hunting for a particular new item, I always to there first. They will list a variety of retailers, rate their service and provide the price with shipping. It is a lot better than spending extended time clicking through Google searches.

    Skype

    If you have long-distance friends or relatives and haven't found Skype yet, you really need to download this service. It provides free phone and video conferencing via your computer. It is great to see and hear your friends. All you need is a Webcam and a microphone. It is fast, simple, easy and cheap. You'll need to set up a time or make a paid call to connect because your friend or loved one has to be online at the same time.

    These are just a few favorites. If you have a favorite, please share it with the rest of us and attache it to this post.


    Sunday, December 23, 2007

    Cleaning Votives/Candle Tarts

    I love candles, but when the votive candles are spent, how do you get them out of the glass holders? The scented candle tarts are no better. They are permanently melted into their holders.

    On a recent visit to Yankee Candle's flagship store in Williamsburg, VA, I learned the secret of cleaning these out--it's the freezer. One of the sales associates told me that if you put the spent tarts in the freezer they would fall right out of the holder. Sure enough, after just about 5 minutes in the freezer, they popped right out.

    I tried the same with a spent votive, and had similar results. I compared the time it took me using hot water and the freezer method, and the freezer was much faster.

    Once the glass votives are empty, I pop them in the dishwasher to get the last residue off and to shine them up.

    Now you can enjoy the candles and have a hassle free way to clean them up.

    Let your light shine!

    Thursday, November 08, 2007

    Gift Bag Tissue Recycling


    I've always recycled my gift bags. I have some that have outlived the presents that were placed in them. You can always tie on a new tag and it's good as new. But the tissue paper is another thing--that always gets trashed... that is until now.

    I saw a tip (sorry can't remember the publication) that advised using your paper shredder to shred the used tissue into shredded paper for your next gift bag. I tried it and it is great.

    There are a few tips you need to know to do this:

    1. Clean out your shredder before doing tissue paper. Otherwise you'll have office paper in your tissue. This includes the bin and blades.

    2. Fold the tissue paper in eighths or sixteenths so that it is thick enough for your shredder to operate. My couldn't sense the tissue unless I had it folded.

    3. Store shredded paper in a Ziploc until needed. Combine colors for a festive look.

    Happy Shredding!

    Wednesday, May 23, 2007

    Reblogging - Lessons since last time

    It's been 5 long months since I've last blogged. But the past 5 months have taught me one thing.

    Get regular mammograms

    OK, so I put it off for a few years. Being in my mid-40's is a little late to start, but I'm glad I finally made time for the test. I had a very scary month, but after 5 additional diagnostic tests, I came back with a clean bill of health.

    But the truth is, had I had regular screenings, I might not have needed all the procedures I endured. I didn't have a baseline for the doctors to compare my current scan to.

    Granted, they did find a lump that needed investigation. Had it not been benign, I would have been in some trouble as it wasn't a tiny lump.

    After the two needle biopsies (the needles keep getting bigger by the way with each test), a compression mammogram (which makes the regular one look like a massage) and ultrasound (the only way to test), the annual mammogram now seems like no big deal.

    Sure a mammogram isn't the most comfortable few minutes you'll spend each year, but it isn't that bad when you compare it to the alternative. Personally, I like being healthy and cancer-free.

    Thursday, January 25, 2007

    New Year, New Resolutions


    Like most of you, I start the year out with a New Year's resolution to lose weight. Technically I was a little successful ending the year 10 pounds lighter than I had started.


    How do you keep your resolutions alive? I believe the key is realistic goal setting.


    In our hurry up, microwave society we assume that all goals should be accomplished in a year or less. But realistically, do you have to lose all the weight this year? What would happen if you finished this year 10 pounds lighter and next year 10 pounds lighter, and so on. Wouldn't you achieve your goal?


    I think long-term goals are the first step. Take some time to think about where you want to be in 5 years, 10 years, 20 years. I have a laminated business card that I carry with me which contains my personal mission statement and long-term goals. These are things that I really want to do, not some passing fancy. I categorize one goal in the following areas: mind (educational), body (fitness), career, and soul (spiritual). I keep the card until all goals are achieved. I am only on my second card, but already I have a couple of my goals checked off, but realize it may take another 3 or 4 years to realize all of them. The key is to be working on them as I go. Eventually, because I am committed to these goals, they will all be completed.


    You can set short-term goals based on the long-term ones--just make them realistic. We often give up because we either set goals we really don't want to achieve or set too short a time frame for completion.


    Take a moment and think about your purpose in life and where you want to be. Ask God for spiritual guidance. Discuss your goals and purpose with others to get insights from those who know you best.


    While plans can change, if you have an overarching goal and directive, you are much more likely to arrive at your destination. And remember, if you don't have a road map, you'll probably get lost along the way.

    Wednesday, October 25, 2006

    Girls and Guys Night Outs

    We tend to think of girl's and guy's nights as something we do with our friends, but why not plan a night with your kids. We have both boys and girls in our family, so my husband and son pair up while I take our two daughters. It provides a great opportunity for bonding.

    Our latest outing took me with our two daughter to the "So You Think You Can Dance" concert. It was a very special treat for us. We grabbed dinner at a local mall and went to the concert. It was a great show and the dancers were so nice, signing autographs and posing for photos after the show.

    On the way home we had a flat tire (time for more bonding) which we were able to air up and ride home on. We will always remember the concert, pics and flat tire!

    I also highly recommend "dates" with your children. They need some one-on-one time, especially when there are multiple children. I find that I have less problems/squabbles with the children following a special outing. It helps your reconnect and find out what is going on in their lives in a way the day-to-day routine can't provide.

    Make it a date!